Appointments can be marked as Completed from any other status. Once an appointment is listed as "Completed" it can then only be Re-Opened, Cancelled, or marked as No Show. It cannot be Checked In from Completed status.
If you mark appointments as Completed, you have the option to send out an email to the Client and/or the Staff about the completed appointment. It will also help you stay organized in the TimeTap Back Office as you'll be able to neatly see the appointments that you have successfully completed in a given time period.
A time stamp of the status change will be listed on the Audit Trail for the appointment that you marked as Completed. This is just another way to stay organized or backtrack as to when you took a certain action.
This help doc covers:
- Completing Checked In Appointments
- Completing Open Appointments
- Completing Cancelled Appointments
- Completing No Show Appointments
- Viewing Completed Appointments
We will also discuss what can be done once appointments are listed as Completed and how you can make these changes in both List views or the Appointment Detail view.
Auto Complete Appointments
By default, Open appointments are set to move to a Completed status automatically after 7 days and will not send out the Appointment Completed email to your clients. The Auto Complete timing and Appointment Completed email configurations associated with this can be adjusted on the Messaging Settings page (Messaging > Messaging Settings).
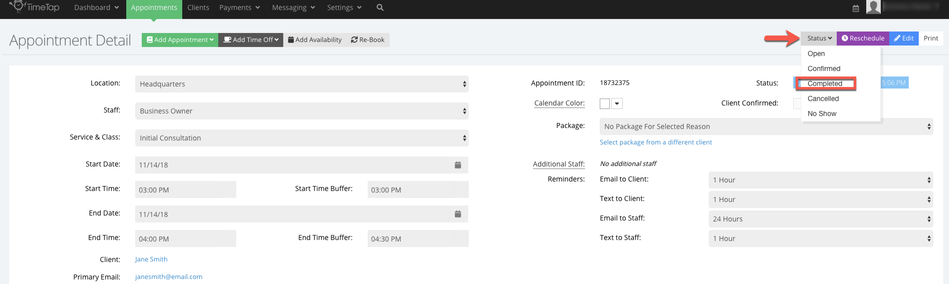
To mark the Checked In appointment as Completed from the Appointment Detail view, select the "Status" dropdown option and click "Completed":
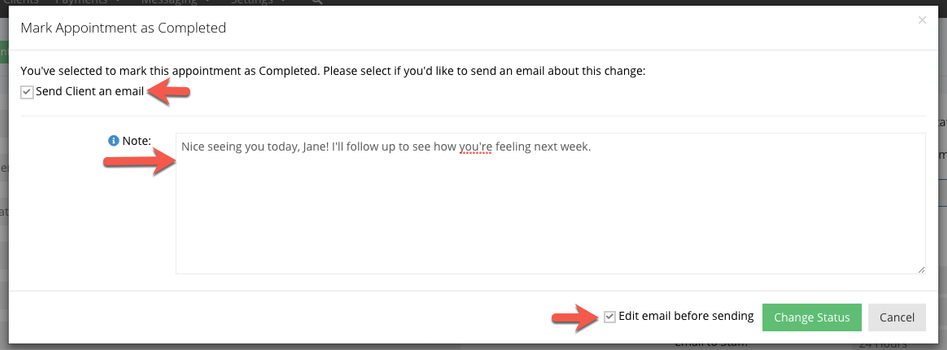
At this point, you will be prompted with the option to send an appointment completed email to the client. If you select that you do want to send an appointment completed email, you can add an optional note into the Completion Note field which can be inserted into the completed appointment email. TimeTap Professional and Business users will also see the option for editing the email before it is sent out:
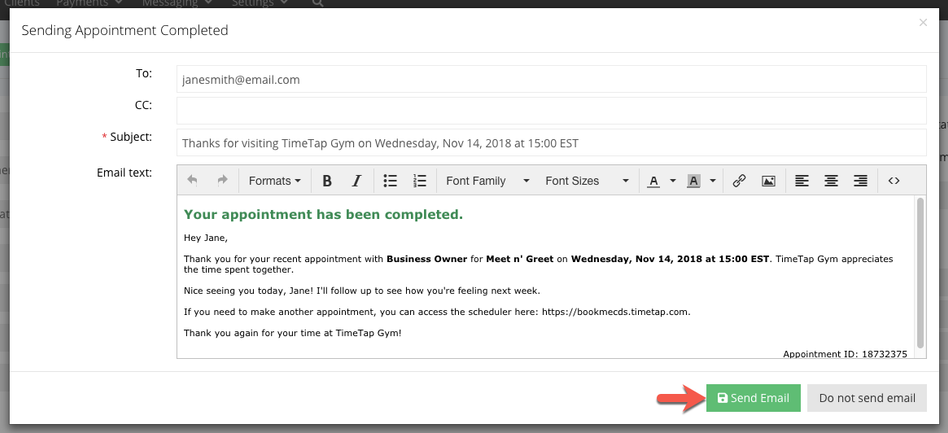
If you selected to "Edit email before sending" then upon pressing "Change Status", a new window will appear to allow you to edit the email before sending it out. Once you've finished editing it, you can press "Send Email" at the bottom of the window to send the email to your client:
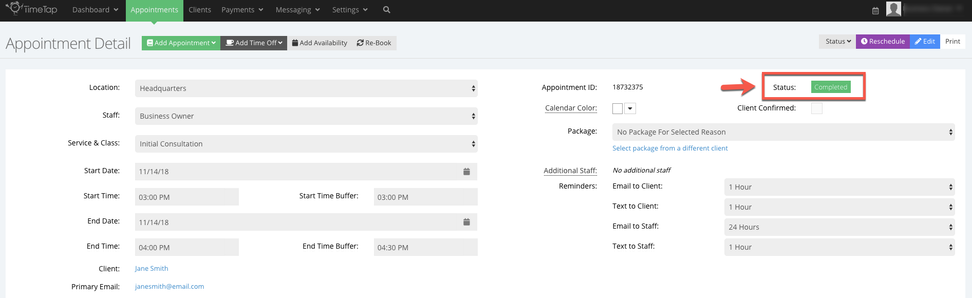
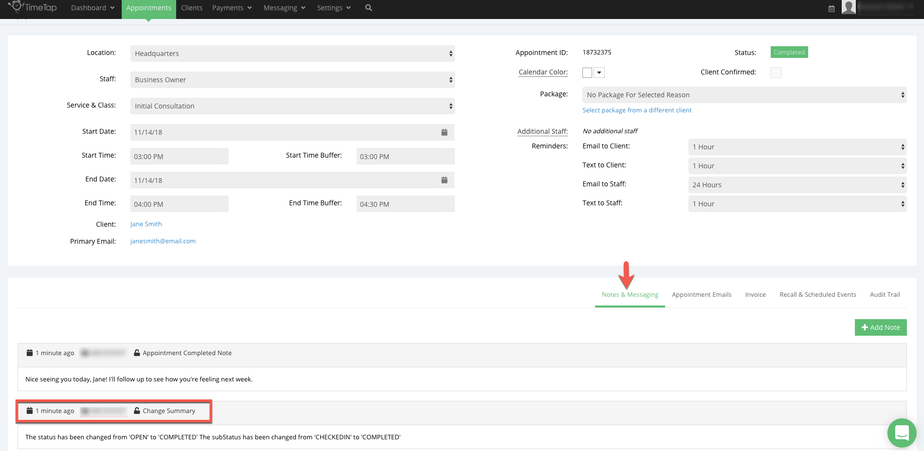
After you press Send Email (or "Change Status" if you didn't edit the email before sending), the appointment detail record will update and show the appointment status as "Completed":
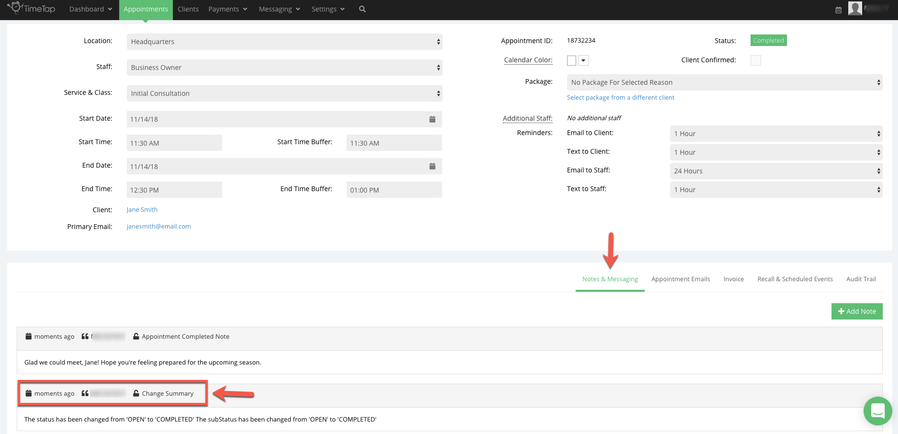
You will also see a time stamp of the status change on the Notes & Messaging tab as well as the Audit Trail tab at the bottom of the screen:
Checked In appointments can also be marked as Completed from the Open list. To do this, navigate to Appointments → Lists → Open In and select the appointments from the list that you want to mark as Completed. Then hit the "Status" dropdown:

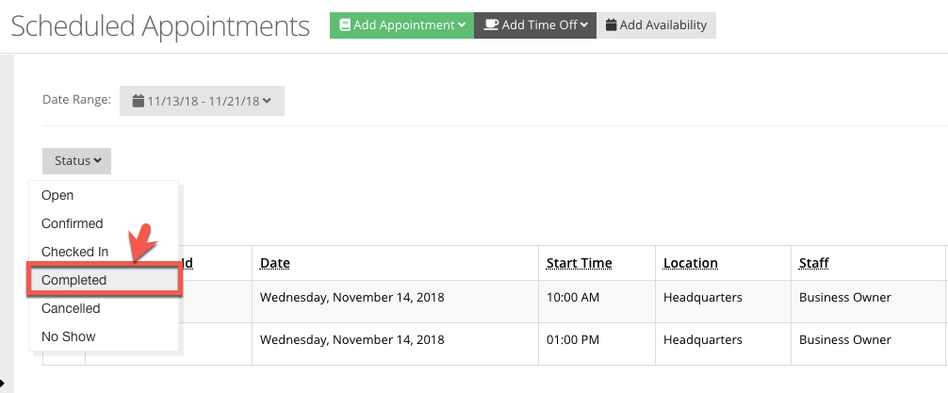
From the "Status" dropdown select Completed:
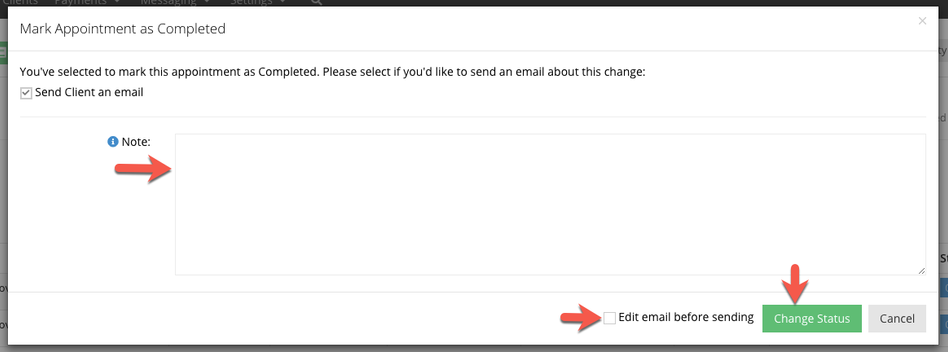
A new window will appear where you'll have the option to add a note which will be a added to the email you're sending to the client and/or edit the email before sending (only if you're changing the status of one appointment):
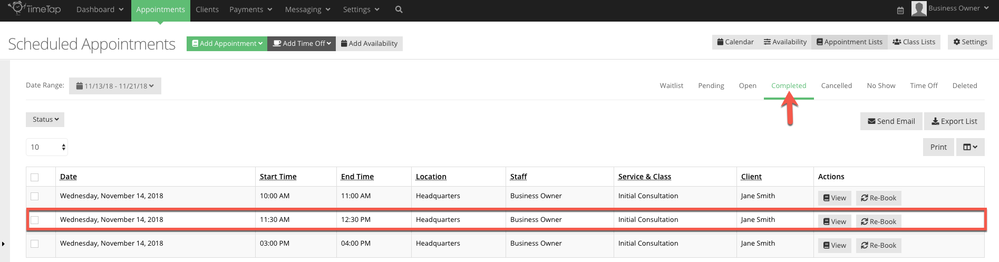
After confirming that you do indeed want to mark the Checked In appointment(s) to Completed, the appointments you marked as Completed will display in the Completed Appointments list:
To mark the Open Appointment as completed from the Appointment Detail view, click the Status dropdown and select "Completed":
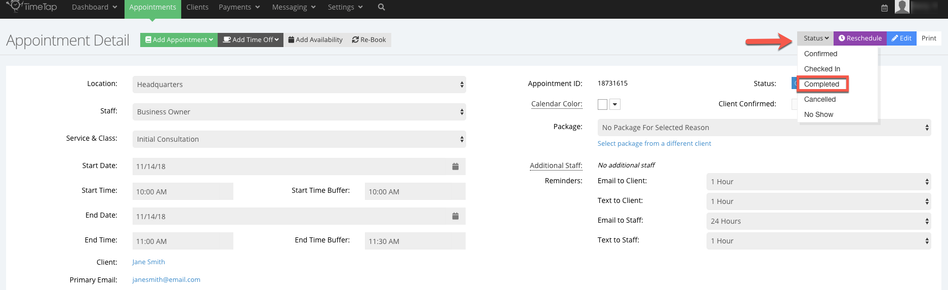
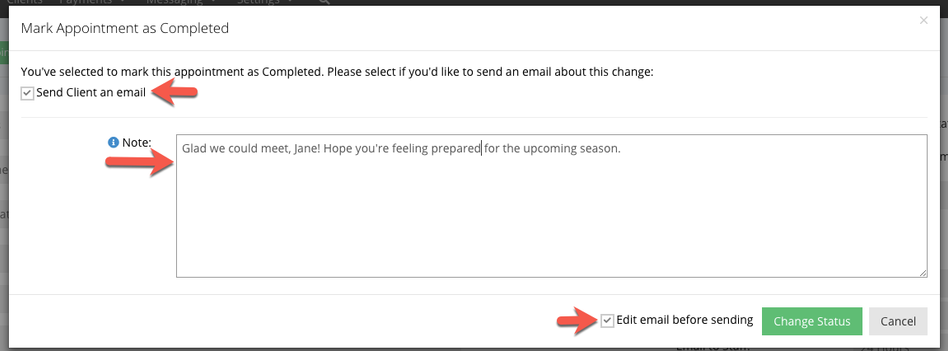
At this point, you will be prompted with the option to send an appointment completed email to the client. If you select that you do want to send an appointment completed email, you can add an optional note into the Completion Note field which can be inserted into the completed appointment email. TimeTap Professional and Business users will also see the option for editing the email before it is sent out:
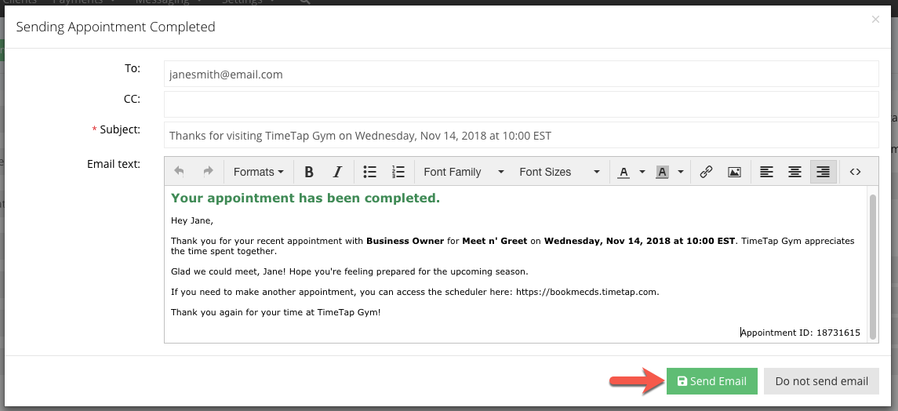
If you selected to "Edit email before sending" then upon pressing "Confirm & Complete", a new window will appear to allow you to edit the email before sending it out. Once you've finished editing it, you can press "Send Email" at the bottom of the window to send the email to your client:
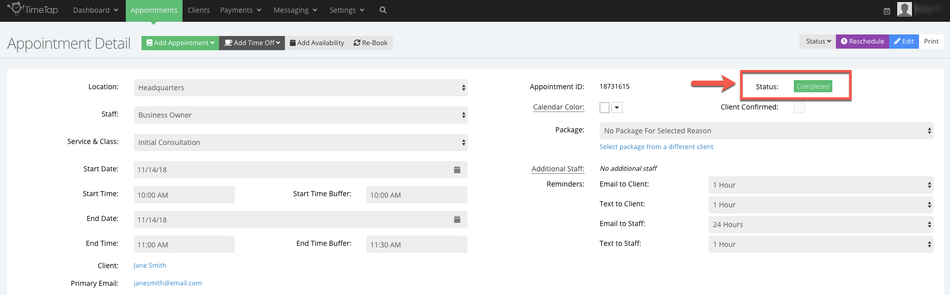
After you press Send Email (or "Change Status" if you didn't edit the email before sending), the appointment detail record will update and show the appointment status as "Completed":
You will also see a time stamp of the status change on the Notes & Messaging as well as the Audit Trail:
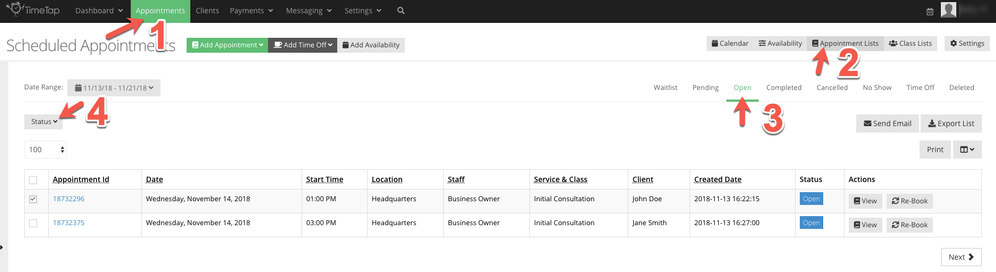
Open appointments can also be marked as Completed from the Open appointments list. To do this, navigate to Appointments → Lists → Open and select the appointments from the list that you want to mark as Completed. Then hit the "Status" dropdown:
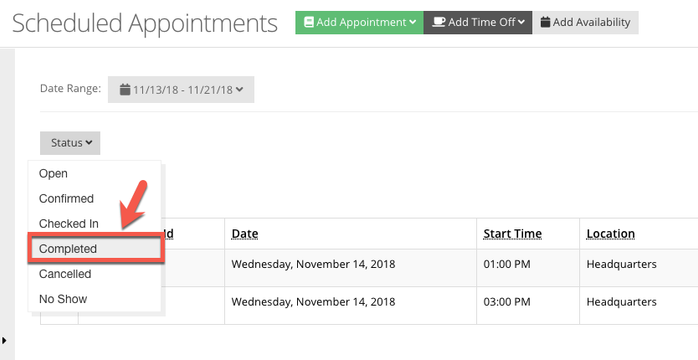
From the "Status" dropdown select Completed:
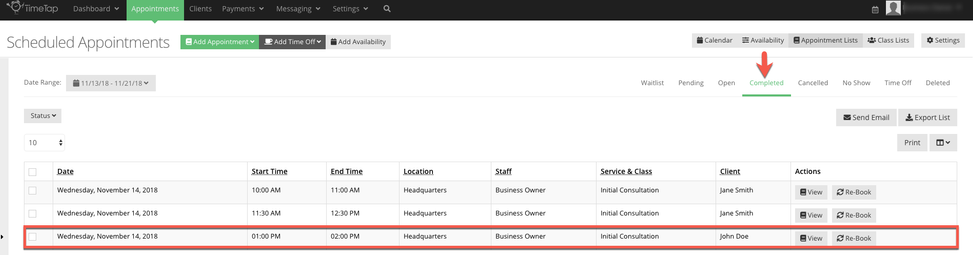
After confirming that you do indeed want to Complete the selected Checked In appointments, the appointments you marked as Completed will display in the Completed Appointments list:
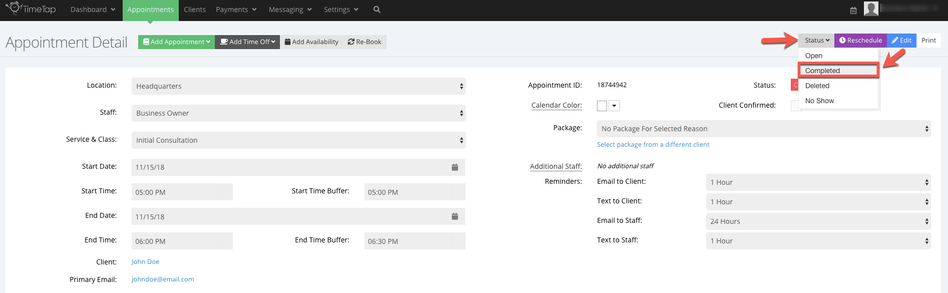
You can do this either from the Appointment Detail screen for a cancelled appointment or from the Cancelled Appointments list view. To move a Cancelled Appointment to Completed status from the Appointment Detail page, go to the appointment record and from the Status drop down select Completed:
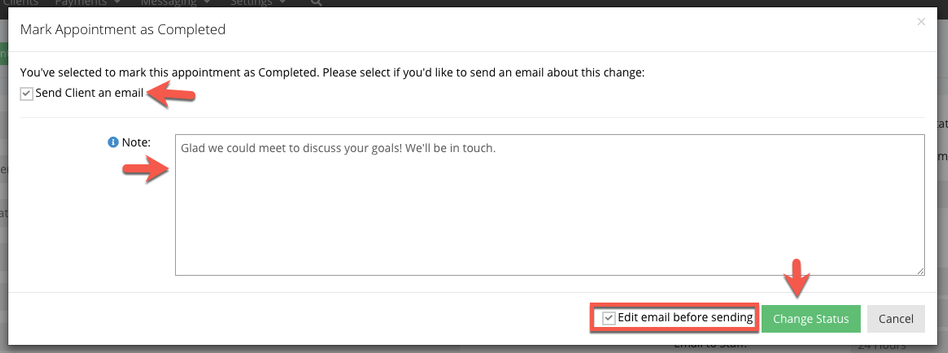
At this point, you will be prompted with the option to send an appointment completed email to the client. If you select that you do want to send an appointment completed email, you can add an optional note into the Completion Note field which can be inserted into the completed appointment email. TimeTap Business and Professional users will also see the option for editing the email before it is sent out:
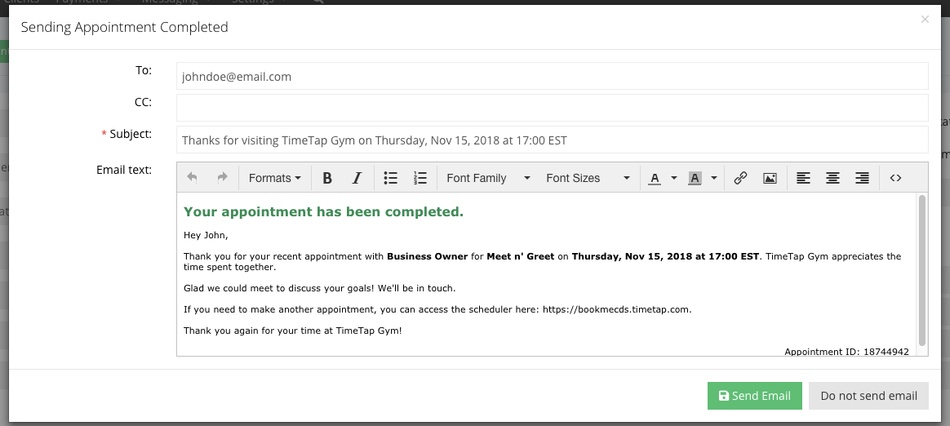
If you selected to "Edit email before sending" then upon pressing "Change Status", a new window will appear to allow you to edit the email before sending it out. Once you've finished editing it, you can press "Send Email" at the bottom of the window to send the email to your client:
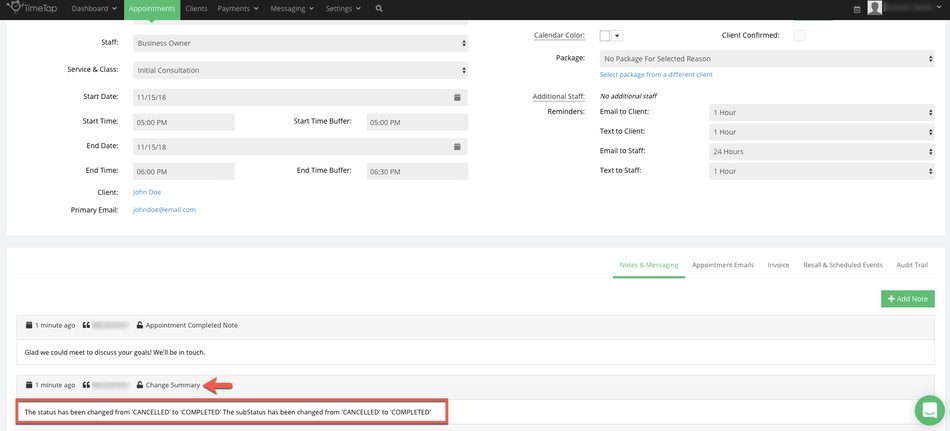
After you press Send Email (or "Change Status" if you didn't edit the email before sending), the appointment detail record will update and show the appointment status as "Completed" and the time stamp for the status change is indicated in the Notes & Messaging as well as the Audit Trail:
As mentioned, you can also change Cancelled Appointments to Completed from the Cancelled Appointments list. To do this, navigate to Appointments → Lists → Cancelled and select the appointments from the list that you want to mark as Completed. Then hit the "Status" dropdown:
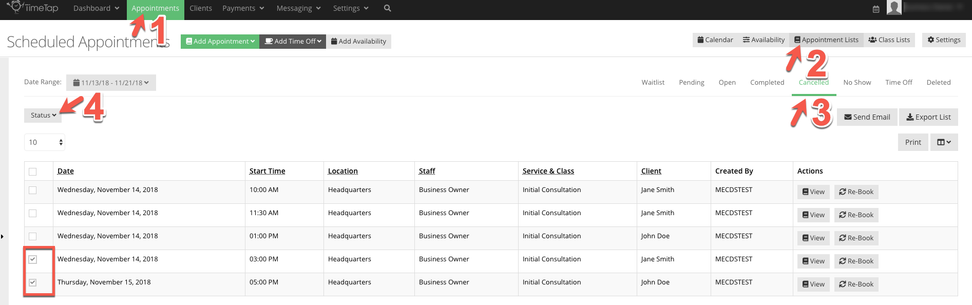
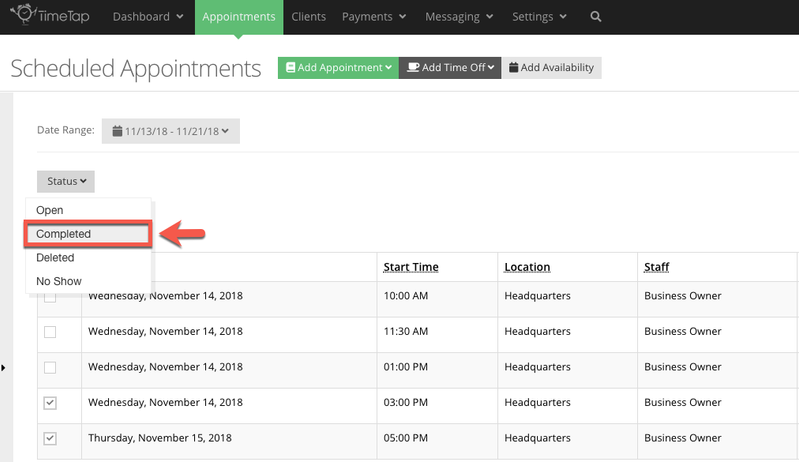
From the Status dropdown select "Completed":
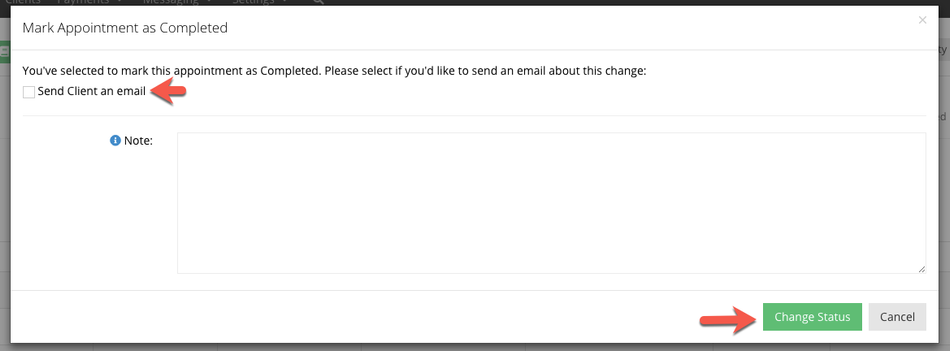
At this point, you will be prompted with the option to send an appointment completed email to the client. If you select that you do want to send an appointment completed email, you can then click the Change Status button to set the selected appointments to Completed:
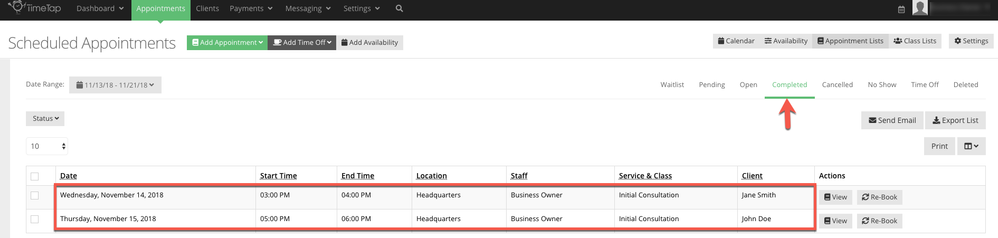
After you confirm you want to move the Cancelled Appointments to Completed Status, the screen will update to show you the Completed Appointments list with the appointments you just completed in there:
You can mark a No Show appointment as Completed from either the Appointment Detail page or the No Show appointment list. From the Appointment Detail page, click the Status dropdown and select "Completed":
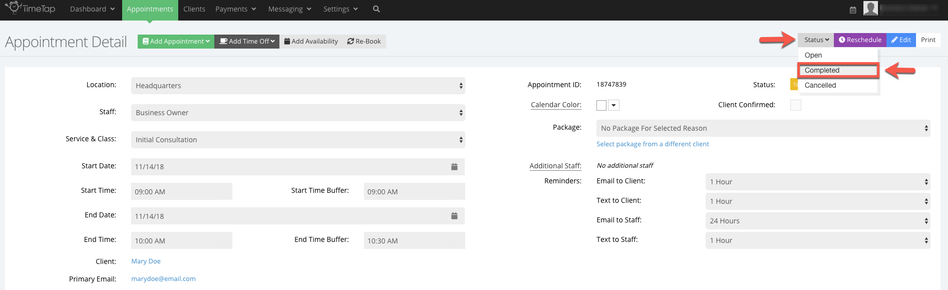
At this point, you will be prompted with the option to send an appointment completed email to the client. If you select that you do want to send an appointment completed email, you can add an optional note into the Completion Note field which can be inserted into the completed appointment email. TimeTap Business and Professional users will also see the option for editing the email before it is sent out:
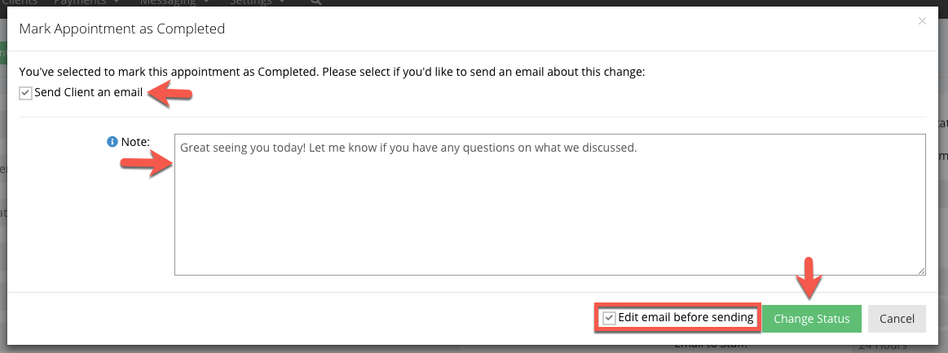
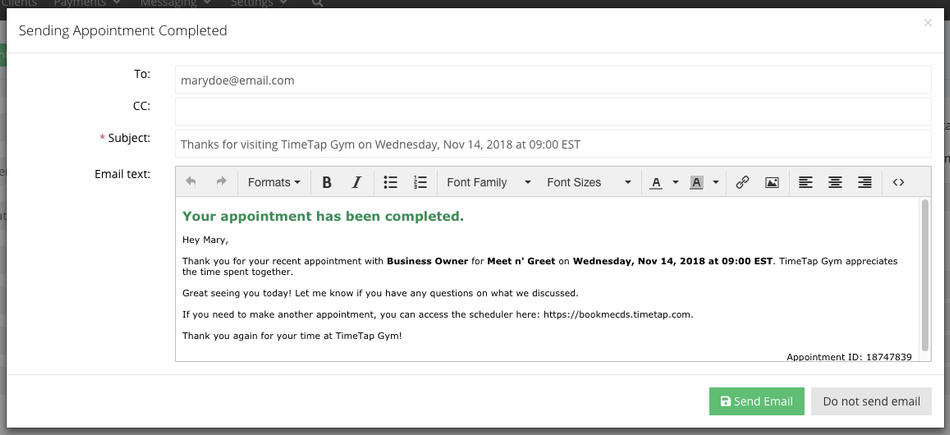
If you selected to "Edit email before sending" then upon pressing "Change Status", a new window will appear to allow you to edit the email before sending it out. Once you've finished editing it, you can press "Send Email" at the bottom of the window to send the email to your client:
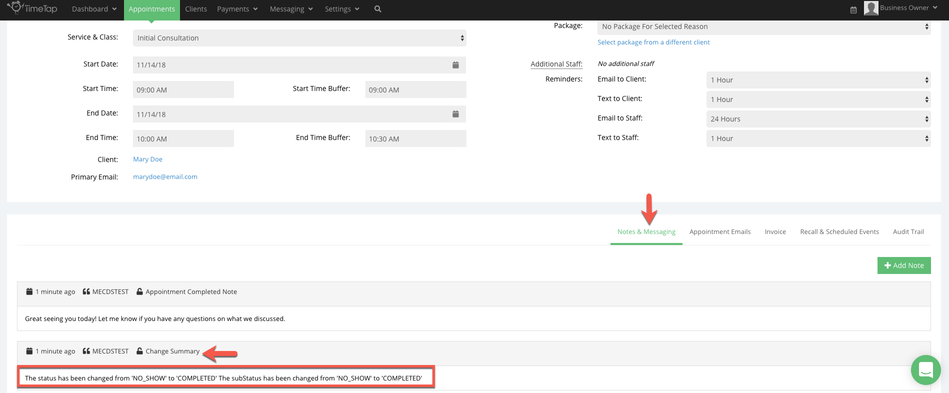
After you press Send Email (or "Change Status" if you didn't edit the email before sending), the appointment detail record will update and show the appointment status as "Completed" and the time stamp for the status change is indicated in the Notes & Messaging as well as the Audit Trail:
As mentioned, you can also change No Show Appointments to Completed from the No Show Appointments list. To do this, navigate to Appointments → Appointment Lists → No Show and select the appointments from the list that you want to mark as Completed. Then select 'Status' > 'Completed.'
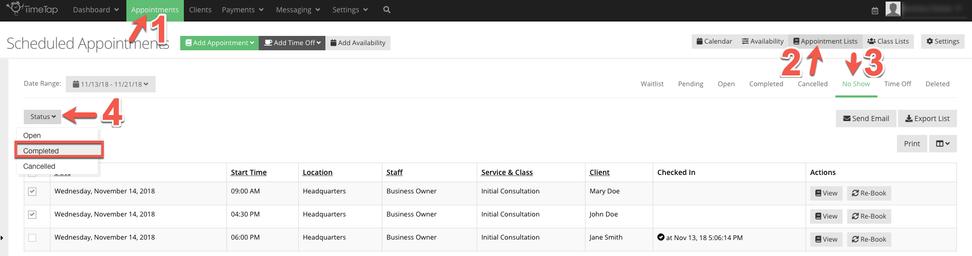
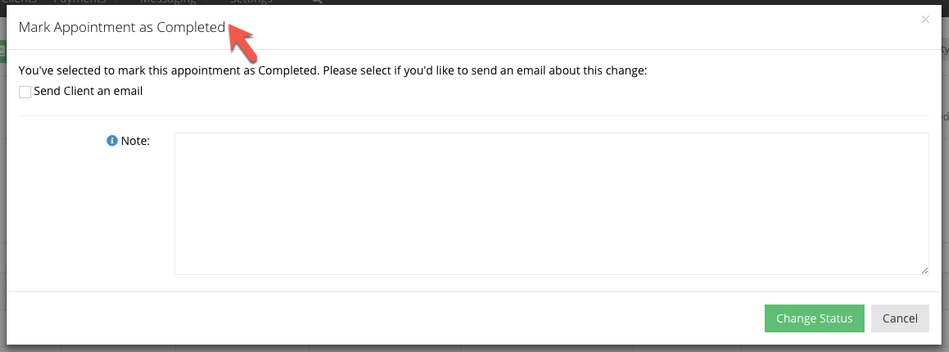
Since you have the option to make these status changes in bulk, he confirmation message as you are marking multiple appointments as completed will show a summary of how many appointments you are changing the status for:
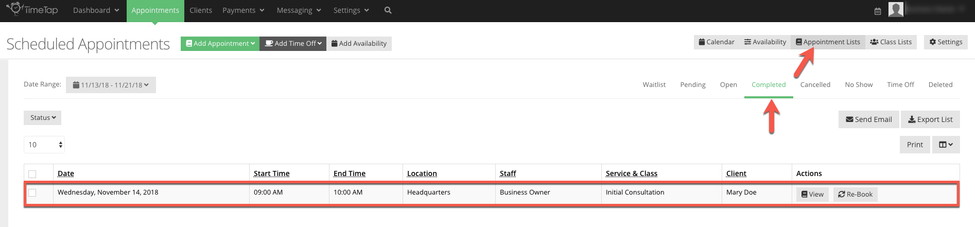
After you confirm you want to move the No Show Appointments to Completed Status, the screen will update to show you the Completed Appointments list with the appointments you just completed in there:
Viewing Completed Appointments
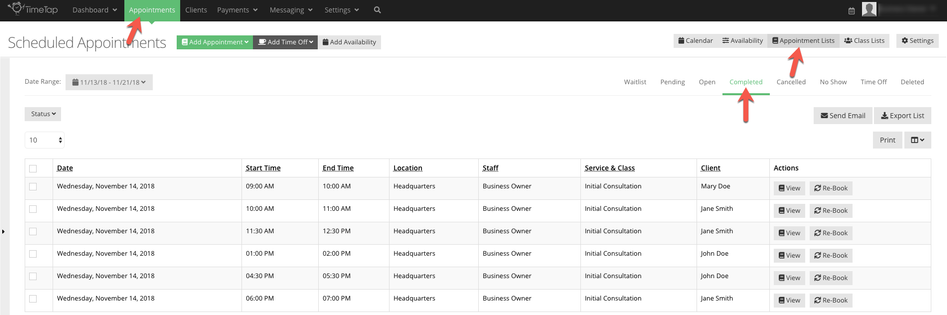
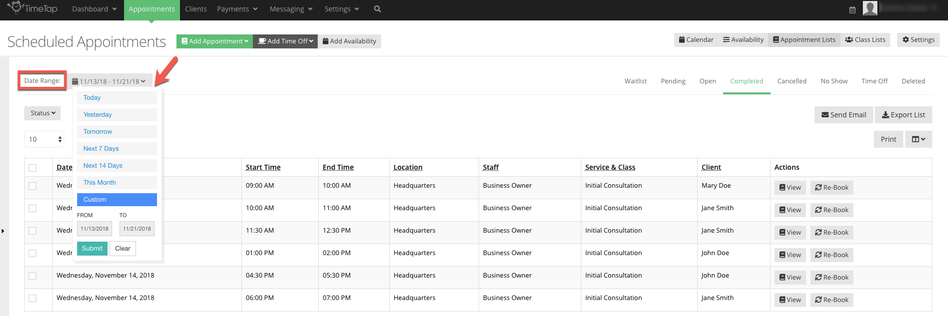
If you customize the date range for this view, the appointments that you see are based on the date the appointment was set for, not the date that you marked the appointment as completed:
You can also find completed appointments on the Calendar view, but you won't see an indication that they are completed unless you click into the Appointment Detail record and see the status there.