After the Add New Booking Site button is clicked we'll be taken to the Add New Booking Site screen - this screen is composed of the following fields -
- Internal Name - This is the name you will use to reference and identify this booking site while logged into the Backoffice. This name is not displayed to your clients.
- Webhandle - This is the dedicated URL where the booking site will be available. If you're on a Business level plan or higher, you will be able to customize it.
- Location Groups to Show - Use this dropdown menu to determine which location groups you want to be available on this booking site.
- Locations to Show - Use this dropdown menu to determine which locations you want to be available on this booking site.
- Staff to Show - Use this dropdown menu to determine which staff you want to be available on this booking site.
- Services & Classes to Show - Use this dropdown menu to determine which services & classes you want to be available on this booking site.
- Show Private Location Groups - Determines if you want to show private location groups on this booking site.
- Show Private Locations- Determines if you want to show private locations on this booking site.
- Show Private Staff - Determines if you want to show private staff on this booking site.
- Show Private Services & Classes - Determines if you want to show private services & classes on this booking site.
- Publish Booking Site - Check this checkbox if you want to allow clients to book at this link. If you're staging it and don't want to open it up for booking quite yet, uncheck this checkbox.
In the example below I have assigned the internal name "Chemistry Appointments at the Tutoring Center", assigned a vanity URL, selected only the Tutoring Center location, selected Staff 1 as the only staff available on the booking site, selected "Chemistry Tutoring" as the only service available and also chose to publish the booking site -
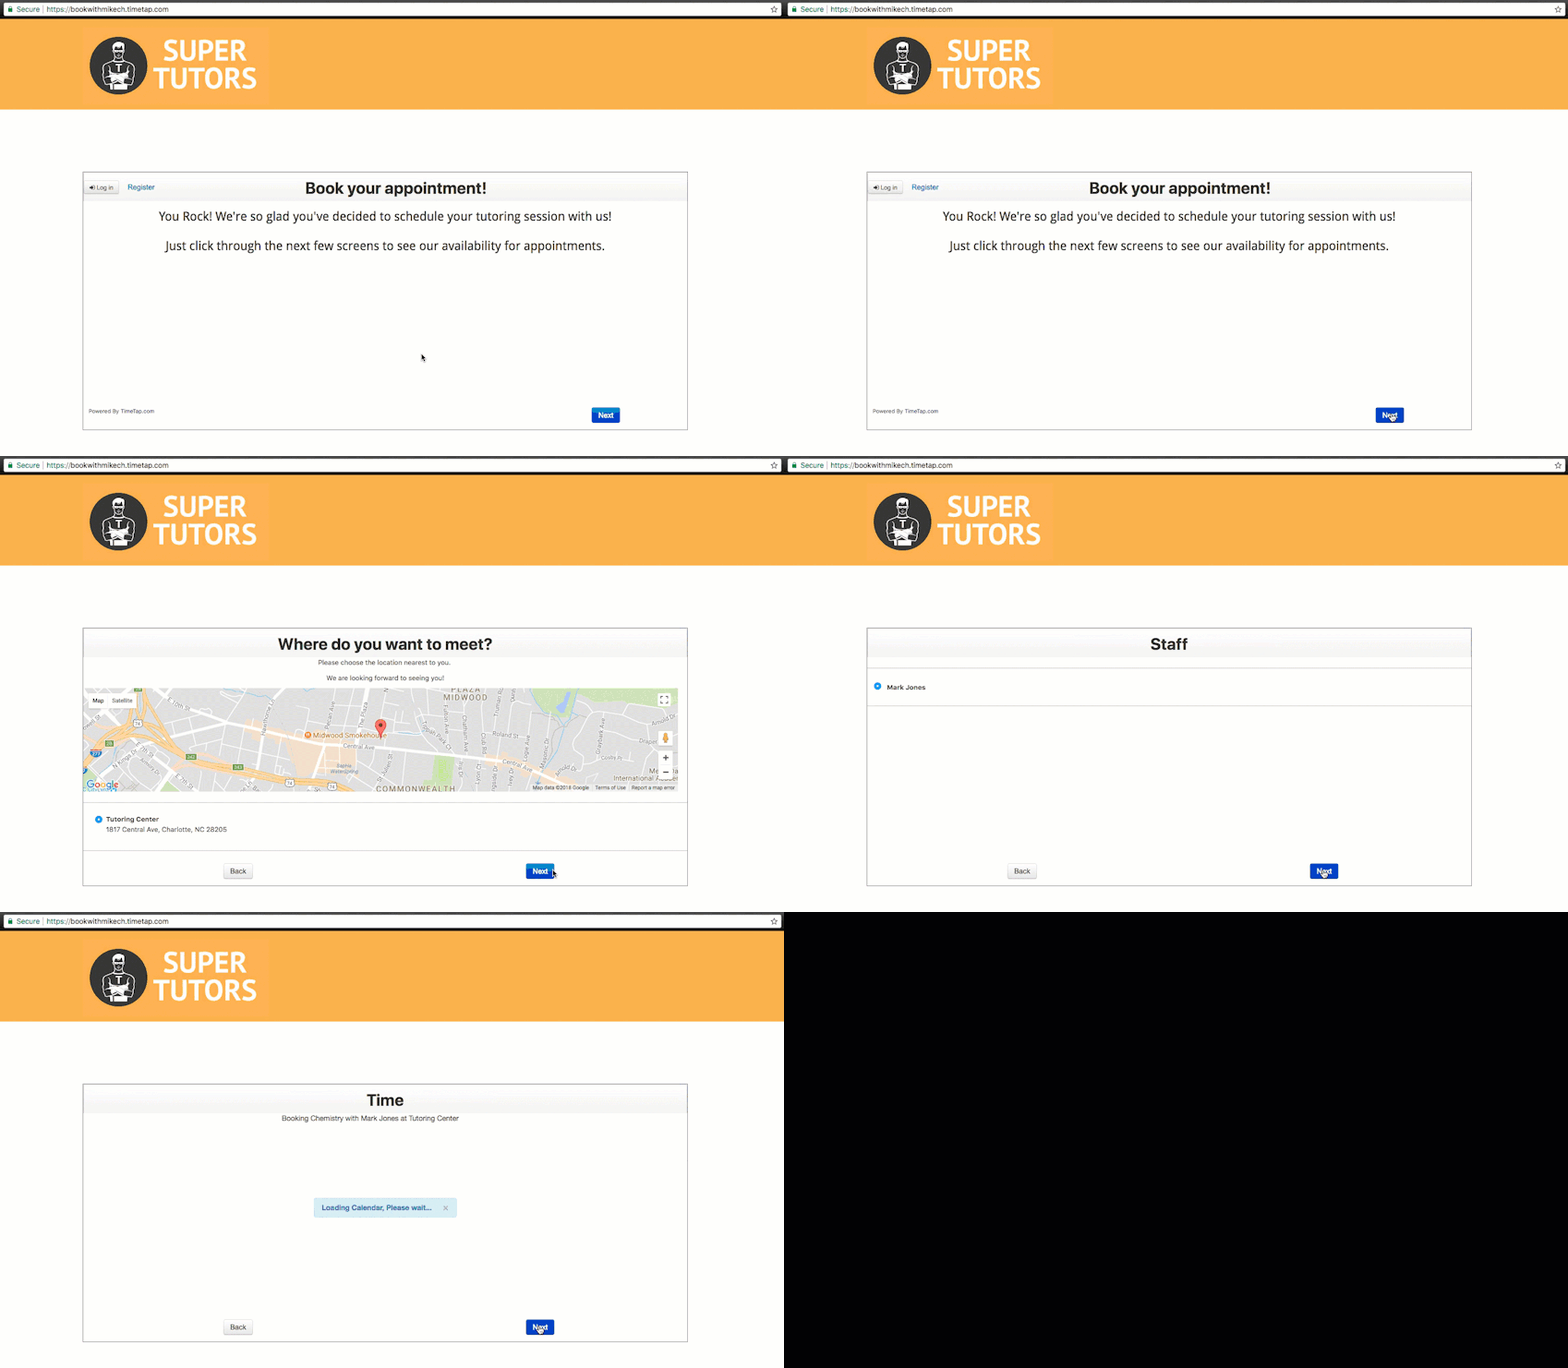
Now if a student visits the URL for this booking site, they will see the availability Staff 1 offers at the Tutoring Center and the only available service will be Chemistry Tutoring -
Then from the Booking Site Profile, you'll need to click on the blue Edit button on the upper right and in the Overview section you can make changes to the Internal Name, Webhandle, Locations to Show, Staff to Show, Services & Classes to Show along with a number of other fields -
To apply the changes you've made, you'll need to click on the green Save button that has appeared in place of the blue Edit button.
To make any customizations to your booking site, you'll need to click on the Customizations tab below the name of your booking site -
In the customizations tab you'll be able to customize -
- Panel Flow - Determines the order of the different panels on this booking site. By default, a newly created booking site will have the same panel flow as assigned on the Scheduler Rules & Logic page.
- Logo - An image uploaded here will appear as the main logo on this booking site. By default, a newly created booking site will have the same logo assigned on the Mini Website Design page.
- Custom Style Sheet - If you want to apply a Custom Style Sheet to this booking site, save that CSS here as an HTTPS link.
- Google Analytics Tracking ID - If you want to apply Google Analytics to this booking site, save the tracking ID here.
- Google Tag Manager Code - If you want to apply Google Tag Manager to this booking site, save the code here.
- Client Login - Set the client login rules for this booking site here. For more info, look here - Client Login.
- Auto Advance - Check this box if you want this booking site to automatically make selections when only 1 option is available.
- Skip Welcome Screen - Check this box if you want this booking site to skip the welcome screen.
- Welcome Title - Set the title that appears in the header bar on the welcome screen of this booking site here. By default, a newly created booking site will have the same Welcome Title as assigned on the Mini Website Design page.
- Welcome Text - Set the text that appears on the welcome screen of this booking site here. By default, a newly created booking site will have the same Welcome Text as assigned on the Mini Website Design page.
- Show Left Hand Text - Check this box to show the left hand text section of this booking site.
- Left Hand Text - This text shows on the left side of the scheduler.
- Logged In Header Text - Set the text that appears when clients log in to this booking site here.
- Book a New Appointment Button Label - Set the label for the Book Another Appointment button here.
- View Appointments Button Label - Set the label for the View Appointments button here.
- Location Panel Title - Set the title of the Location panel here.
- Staff Panel Title - Set the title of the Staff panel here.
- Service & Class Panel Title - Set the title of the Service & Class panel here.
- Time Panel Title - Set the title of the Time panel here.
- Client Information Panel Title - Set the title of the Client Information panel here.
- Final Confirmation Panel Title - Set the title of the Final Confirmation panel here.
- Appointment Saved Message - Set the message that appears when the appointment gets booked here.
- Multiple Appointment Date List - Set the data you want to get pulled with the %REPEATING_APPT_DATE_LIST% email tag here.
- Appointment Saved Message for Multiple Appointments - Set the appointment saved message that shows to clients when they book multiple appointments here.
- Show 'Book Again' Button - Check this box if you want to show the Book Again button on this booking site.
- Button Redirect URL - Set the URL that you want the Book Again button to lead to here.
- Hide from Search Engine - Check this box if you want to block this booking site from returning on search engine searches.
If you've chosen to display the left hand panel or the bottom section on this booking site, they will be displayed on all of your booking sites.