You can sync each of your staff accounts with 1 or more Google accounts. Using our Google Calendar Sync will allow you to -
- See all of your TimeTap appointments on your Google Calendar.
- Sync all of your Google Calendar appointments where you are listed as "Busy" to TimeTap and block off your availability so that no clients can book appointments during that time.
- Add appointments to a Google Calendar that you and your colleagues contribute to.
- Sync appointments to multiple Google calendars and sub-calendars.
In this help doc we'll cover -
From the staff profile, click on the Calendar Sync tab -
On the Calendar Sync page, you'll see the option to sync your Google Calendar to TimeTap. Click on the Google icon to set up your Google Calendar Sync -
If you are already logged into Google on your current browser session, TimeTap should auto detect the Google Account you are logged in as. If you need to sync TimeTap with a different Google account, you should log out of Google before initiating the sync.
This will take you to the to the "Sign in with Google" page where you will be prompted to choose which Google Calendar you want to sync to your TimeTap calendar -
Once you have selected the Google Calendar you want to sync with, you will be taken to a page where you will get prompted to allow the TimeTap Calendar Sync access to your external calendar. You will need to click on the Continue button to allow this access -
Once you press Continue, you'll be taken back to TimeTap and your sync will start to run. The first sync typically takes about 30 minutes to complete. After that the calendars will update automatically about every 15-20 minutes.
Once you've clicked on the View Feed button a new window will appear informing you of the most recent appointments synced over from your Google Calendar. In the example below I can see that 3 appointments from my Google Calendar have synced to my TimeTap calendar -
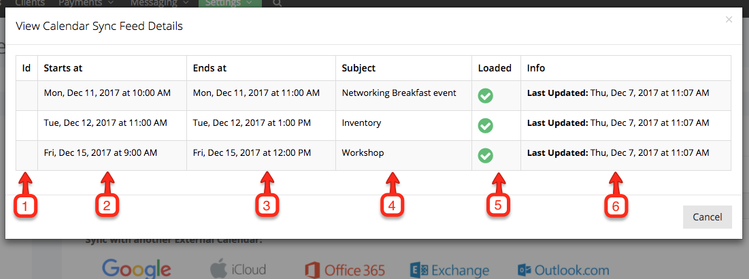
The table shown in this new window is broken down in 6 columns, each showing a different piece of information.
- ID - This is the ID assigned to this appointment in TimeTap - you can use this number to search for this specific appointment in TimeTap.
- Starts at - This is the time and date the appointment is set to begin.
- Ends at - This is the time and date the appointment is set to end.
- Subject - This is the information that was entered in the subject field in your Google Calendar at the time the appointment was created.
- Loaded - This lets you know if the appointment was successfully loaded into TimeTap.
-
Info -
- If the appointment was loaded, then this will tell you the last time the appointment was updated in Google.
- If the appointment wasn't loaded (and it is a TimeTap appointment or a Google appointment which you are listed as Available for), then the info section will tell you why it wasn't loaded.
If you are looking at your appointment sync feed and you see a red x in the Loaded column, don't panic! This red x just means that the appointment has already synced to your Google Calendar and when Google sent the information to sync to your TimeTap account, TimeTap rejected the appointment because it was already in your calendar or because it was a Google Calendar appointment where you are listed as Available -
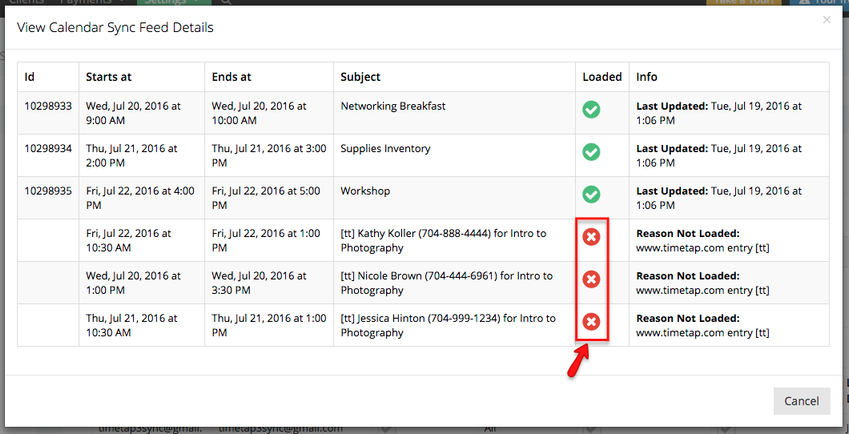
Here is a closer look -
The "[ext]" means that this appointment is coming from an external calendar source. If you click on the appointment block, you will get taken to the external appointment detail screen -
If you need to make changes to the Google Calendar appointment, you will need to log in to the associated Google Account to make those changes. If you try to make changes to a Google Calendar appointment from TimeTap, you will see an error message stating that you cannot make changes to the appointment -
Here is a closer look -
If you open the appointment up on your Google Calendar, you will see that TimeTap also gets listed as the source for the appointment -
It is not recommended that you make any changes to TimeTap appointments inside Google. While Google will allow you to do so, it will likely result in more confusion than anything. We recommend that if you need to make any changes to TimeTap appointments you simply log in to TimeTap to make those changes.
On the Calendar Sync page of the staff profile, you'll want to click on the red Stop Sync button -
A new window will then appear where you will have to confirm that you do want to stop the sync -
And you'll see a small confirmation that the sync has been stopped -
Then your Calendar Sync tab will return to how it was before you initiated the calendar sync -
We have just finished syncing and un-syncing with 1 Google Calendar. We will also discuss -