Once an invoice is created on your account, you'll want to be able to either charge a credit card to take payment or record payments that were taken off of TimeTap (maybe they paid through cash or in office on your credit card machine).
Invoices in TimeTap have an easy way to allow you to do either of these things. On an invoice, you'll see options either under the More Actions button or under the View Transactions tab at the bottom of the screen to either (a) Charge with Payment Gateway or (b) Record a Payment. Here's the difference between the two -
- Option A: Charge with your Payment Portal - If you have set up a payment portal on your account, you will have the option to receive payment on the invoice by charging the client's credit card through your payment portal. This does require that you have a payment portal set up on your account, so if you haven't done that yet, be sure to go to Payments > Payment Settings to set one up.
- Option B: Record a Payment - We know that we're not the only way that all businesses accept payments for their appointments. Many businesses accept credit cards in office after the service has been rendered or even cash or check payments. This doesn't mean that you don't want to keep track of that on the invoice! With TimeTap, you can easily record a payment that was taken in office and see that payment show up as a manual entry.
Click on the links above to jump to the section of this documentation where we discuss Charging Payments or Recording Payments.
As well as under the More Actions button -
Something to note - If you do not have any line items on your invoice, then these options will be disabled. Since you do not have a balance that you can pay for, there'd be no point in charging or recording a payment
Now, to actually charge a payment through your payment portal, click on the button to Charge with Payment Gateway -
This will open up a window where you can enter how much you are looking to charge -
In most cases, I would imagine this will be the full balance on the invoice, but it is possible that you have a client that is paying in installments. Whatever the case may be for you and your invoice, you'll enter the amount you want to charge in the window that appears and then see how the amount entered affects the overall balance.
So, on this invoice, if you enter $344 (the overall balance of the invoice) the payment summary would update to show the balance being entirely paid off -
If this was how much you wanted to charge, you would enter that amount and click on the green Charge Amount button to open up LumaPay (or whatever payment portal you are using).
For the purposes of this demo, since I am paying for this demonstration with my own money ( gotta love educational resources!) I am only going to charge 5 dollars. I'll enter that amount and then click on the Charge Amount button -
For this demo account, clicking on Charge Amount will open up LumaPay (since that's the payment portal I have set up on this account). If you have Square or another option set up on your account, then it would open up that payment portal instead. The rest of this documentation section deals mostly with how this will look in LumaPay, but it works pretty much the same with every other payment portal.
Once I clicked on Charge Amount, I noticed that the first time I did this that my browser ended up blocking the external launch of the payment portal. If nothing happens for you either, your browser may be blocking pop-ups as well. Look for any indication on your browser that a pop-up was blocked. In Chrome that looks like this -
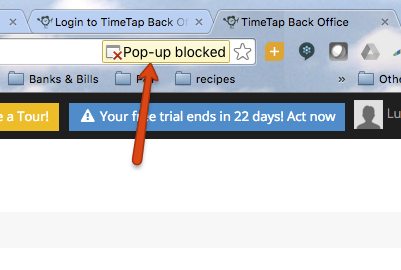
If this happens, click on the notification and select to "allow pop-ups" -
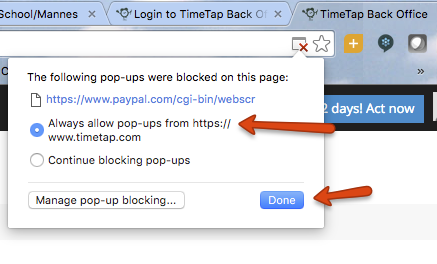
You'll then have to enter in the charge amount again by clicking on the Charge with Payment Gateway button again. Once you do that, you should be able to launch the payment portal since you are no longer blocking pop-ups.
Once you get passed through to LumaPay (or your respective payment portal) you'll see that the payment summary is currently listed as whatever you entered as the "Charge Amount" -
Once the payment has been processed, you can refresh your TimeTap Invoice Detail page and you'll see the payment show up under the View Payments tab on the invoice (this can take a few minutes to come through - so you may have to refresh a couple times before the LumaPay information shows up - but once you get the confirmation from LumaPay you can rest assured that the amount was paid and will come through to TimeTap) -
At the present moment we don't have a way to refund LumaPay payments, so the actions menu is blank for a payment made through LumaPay. You'll notice, however, that we do record the LumaPay Transaction ID under the Payment Details/Comments, so you can grab the transaction ID from this payment and log in to your LumaPay account to initiate a refund. You can then use the Record Refund button in TimeTap to indicate that you gave a refund through LumaPay.
Undoubtedly, however, there will be instances where your clients need to pay through an alternative method. It could be that they paid with their credit card in your in-office swipe machine, or it could be that they handed you cash or a check after their appointment.
Whatever the case may be, you'll still want to record the payment for your bookkeeping purposes. Fortunately, TimeTap's got an easy method for recording and keeping track of payments made outside of TimeTap. We refer to this as recording a payment to differentiate it from charging a payment through your payment portal. Recording a payment simply means you are taking note of a payment that was made, and not actually processing the payment.
To record a payment on an invoice, you can click either More Actions > Record a Payment -
Or click on the Record a Payment button under the View Transactions tab -
Either way, you'll bring up the window shown below where you'll have several options for recording your manual payment -
Let's go over these fields in order -
- Payment Amount - This is how much was actually paid. This could be the full balance amount or it could be just part of the balance amount. It cannot be more than the balance amount and it cannot be blank (or $0).
- Payment Date - This is when the payment was actually taken. In most cases it will be today's date (which should be automatically filled in for you), but you can change it to a date in the past or in the future.
- Method - By default, you'll see a list of your account's manual invoice payment methods. You can select one of these payment methods.
- Payment Comment - This is a good place to store a short note about the payment. It could just be the receipt or confirmation number from your payment processor in office, or it could be the last 4 digits on the card they used if they paid in office. Alternatively, you could enter in the check number if they paid by check. Just something to help jog your memory down the road! This field isn't required, but it is good practice to put something in here just to help you out.
As you enter in a payment amount, you'll see the payment summary at the bottom of the screen update. If you enter in $100, you'll see the Paid to Date amount go up and the Balance go down -
If you enter in the full balance amount, the Balance will go to $0.00 and the Paid to Date amount should match the invoice total -
Once you've entered in the amount, date, a method and a comment, click on the button to Record Payment -
The payment will now show on your payments list. If the payment was for the full balance amount, your invoice will be marked with a status of "Closed - Paid" -
You can always manually delete recorded payments or refunds and enter them again if you got something wrong using the red Delete button to the right of the payment item -
If you have to do that, you can use the More Actions > Reopen Invoice option to reopen the invoice and enter in a different payment.