Keep your clients on the same page with our Translations feature! This feature allows you to pre-translate your scheduler so that your clients know what's going on, regardless of their language or where they are - all according to the settings on their computer/internet browser. You can control which pieces you translate or keep the same, how many languages you have available and exactly what it translates to. We'll go over:
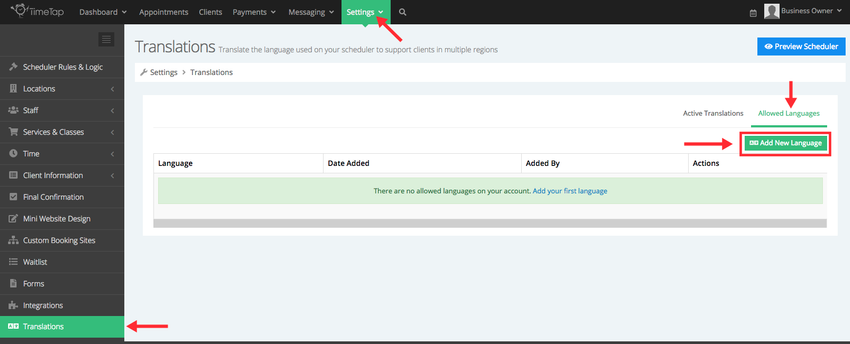
You would do this by going to Settings → Translations → Allowed Languages → Add New Language and click the "Add New Language"button:
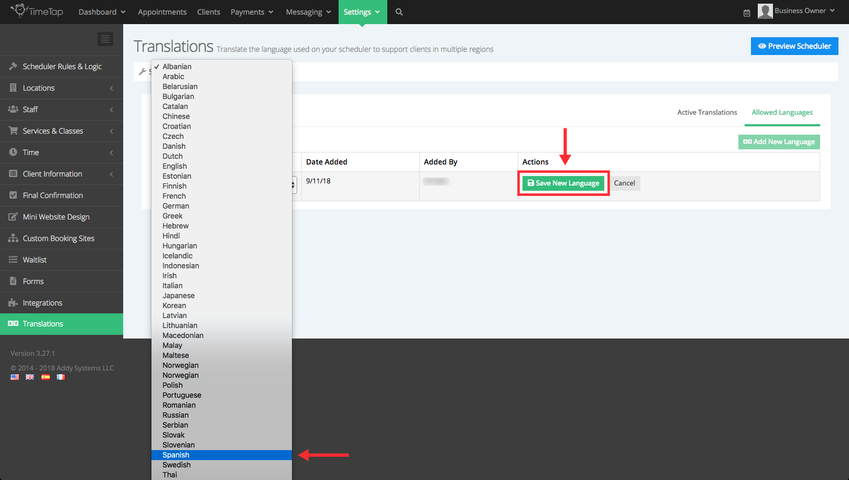
You'll see a line item get added to the table below. Select the language you want to add and click the "Save New Language" button:
Repeat these steps for any additional languages you want to allow for. After you've selected all your languages, you should see them in your Allowed Languages list view:
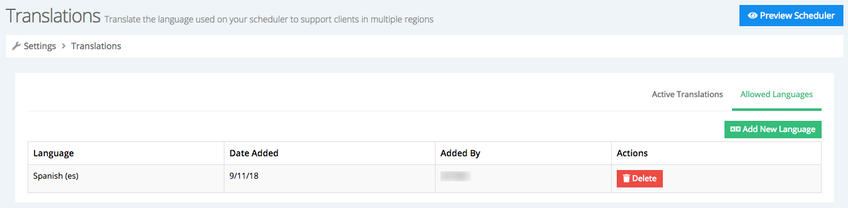
Upon clicking on 'Add New Language' a row in the table will populate with the following information:
Language - Choose the language you wish to allow from the drop down menu
Date Added - Date the allowed language was added
Added By - Staff member who added that language
Actions - Where the ability to delete the language will appear
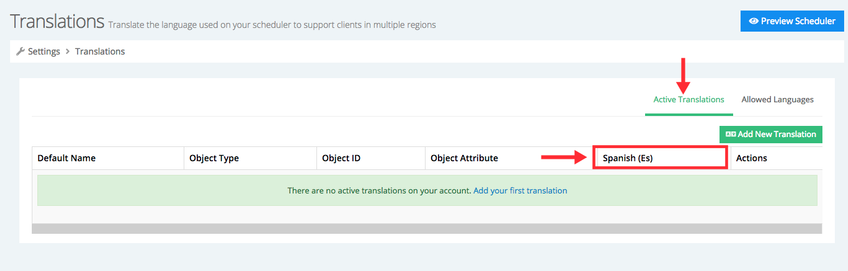
If you toggle to your "Active Translations" list view, you'll also now see a column (or more depending on the languages you added) for the language in that view, even if no translations have been added yet:
Now that you have your allowed languages configured, you are all set to start setting up translation values.
In this section of the documentation, we'll walk through translating a few of these properties and we'll see how they look on the resulting scheduling page. If there are any properties you want to translate but you're not sure how to set up the translation for the property, please just send our support team an email and we'd be happy to help.
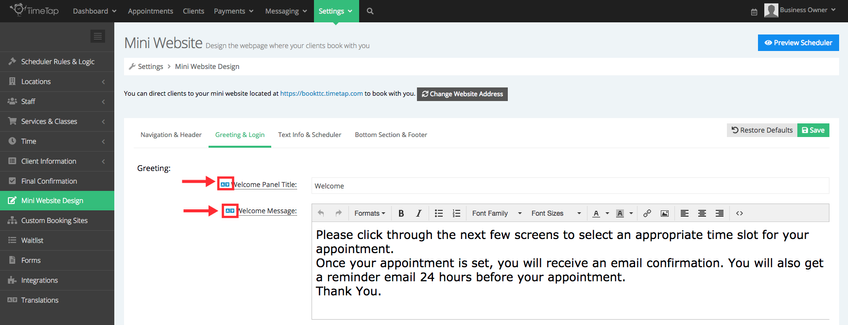
We'll begin to adding Spanish translations for the Header Text label (text that appears above your scheduler in your mini website, Welcome Panel Title, and Welcome Message. Go to Settings → Mini Website Design and locate the Label field under the Header Text section:
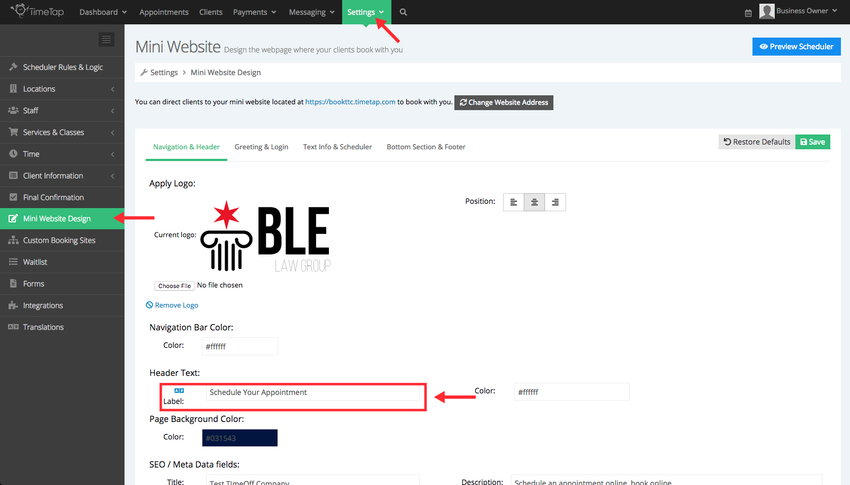
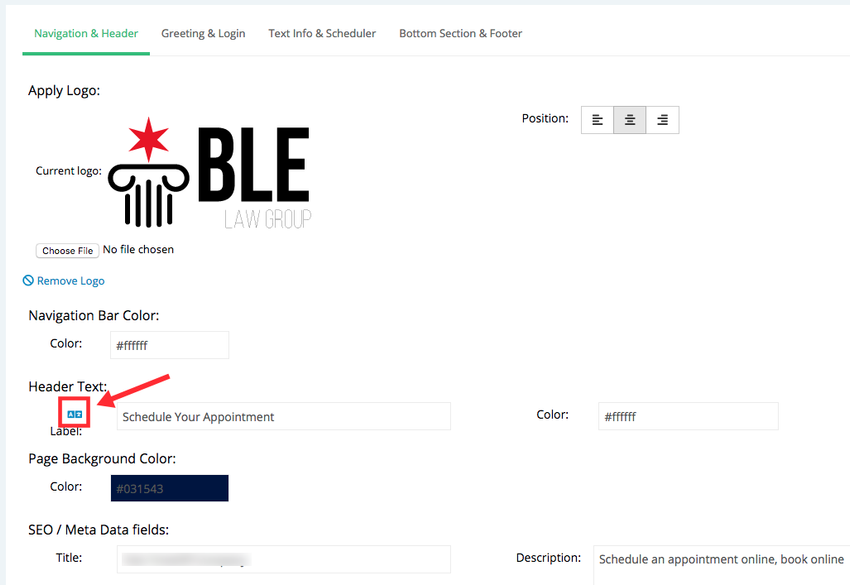
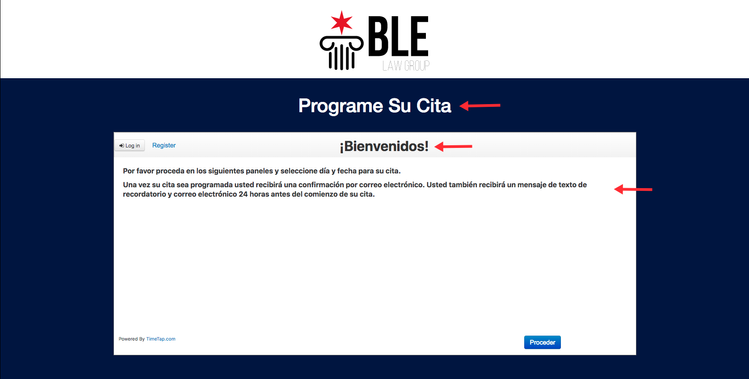
The default text in the Label field reads "Schedule Your Appointment", I want my Spanish speaking clients to see this text as "Programe Su Cita", to add the translation click the translation icon ( ):
):
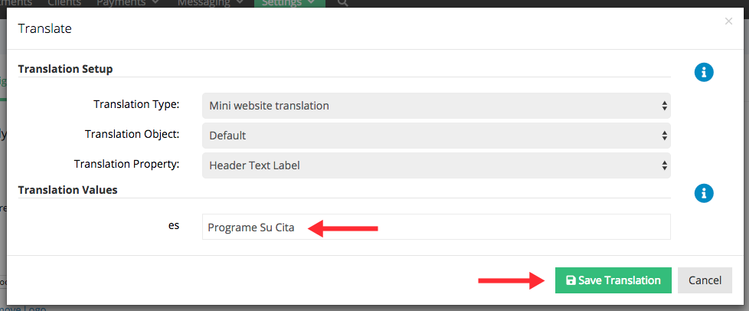
A new window will appear, after the translation is entered, click the Save Translation button:
As you add translations these will be listed under Settings → Translations → Active Translations:
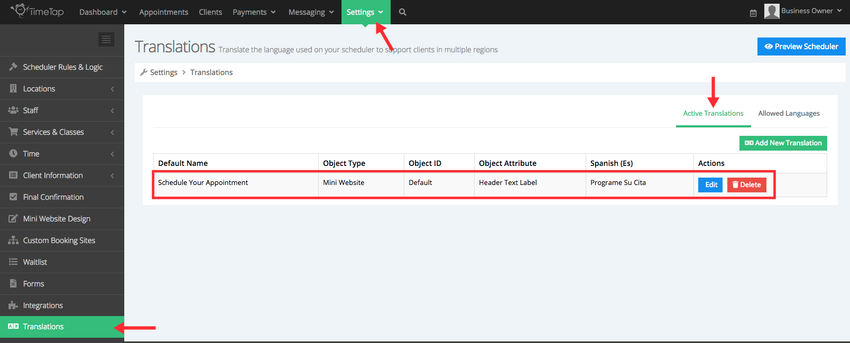
The Active Translations tab is composed of the following headers:
Default Name - This is what the text defaults to (i.e. Welcome on the welcome screen)
Object Type - Where you specifically want the translation to be (i.e. location page, services & classes page, etc)
Object ID - Which scheduler you want it to apply to. So if you want it to apply to your default one with all options or a custom one you created for a particular service group)
Object Attribute - Which part of the page you chose you are translating specifically (i.e. welcome message, next button label)
Actions - Where you're able to edit or delete your translation
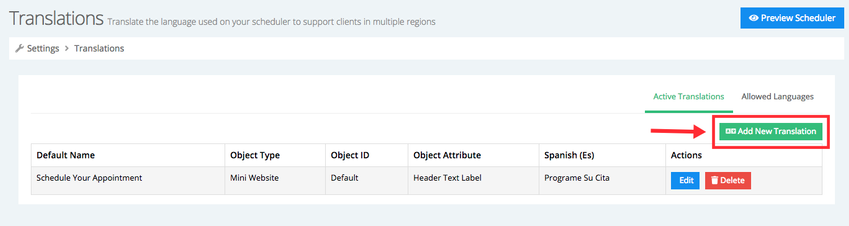
Translations can also be added from the Active Translation tab, just click the Add New Translation button:
In the pop up window, I'm going to select the following options:
- Translation Type: Scheduler translation (since the property that I want to translate is the Welcome panel title)
- Translation Object: Default (since I want to translate the default object)
- Translation Property: Welcome Panel Title (I want to make it so that if a client whose preferred language is Spanish goes to book an appointment in my mini-website, they see ¡Bienvenidos!)
I'll then enter the translation value and click the Save Translation button:

es - The language code for the Allowed Language and where you'd enter the text that will appear via translation
You'll now see this translation among your list of active translations:
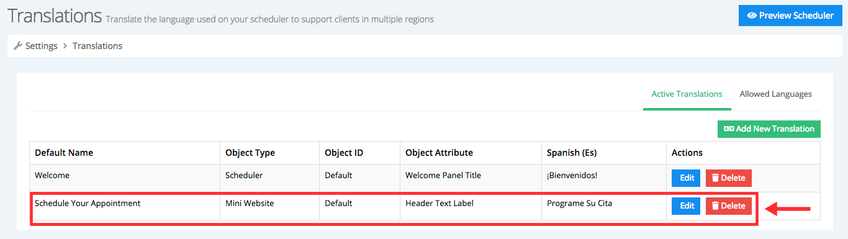
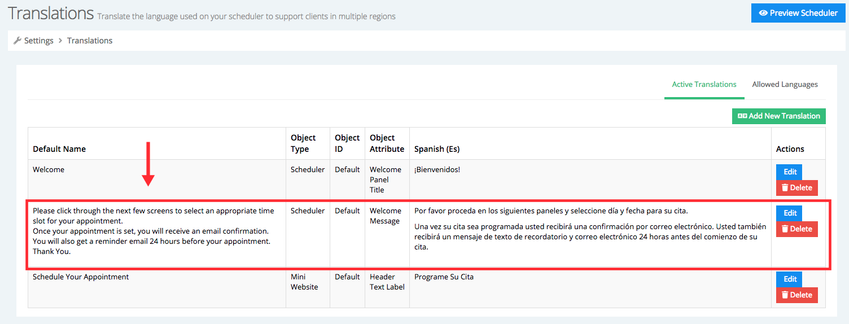
I'll follow the steps mentioned above to add a translation to the Welcome Message in the Welcome Panel:
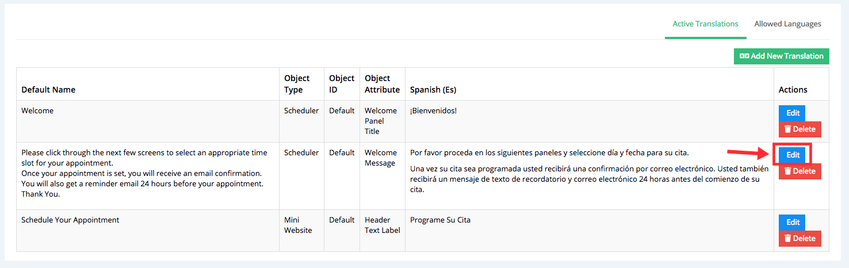
If changes need to be made to your translation you can click the Edit button next to the translation you want to change:
A new window will appear where you'll be able to see the translation you entered, after all your changes are applied click the Save Translation button:

If you rather go to the section you'd like to translate and edit it, you would need to look for the blue translation icons to the left of various sections (like service name or welcome panel title).
Now, after all the translations have been entered and a client who has setup his or her browser's language to Spanish visits our mini-website, the areas where translations were applied will appear in the language allowed, in this case it's Spanish:
For the purposes of this demo, We will cover how to do this for the New Appointment by Client email template that sends out to the candidate immediately after they make an appointment on the scheduler. Please note, that you'll need to follow these steps for any and all of the appointment templates that your clients may receive and that you want to have the proper language reflected on.
To start, find the email template category that you want to provide a translation for under Messaging > Appointments Templates > To Candidates and click the "View" button next to it:
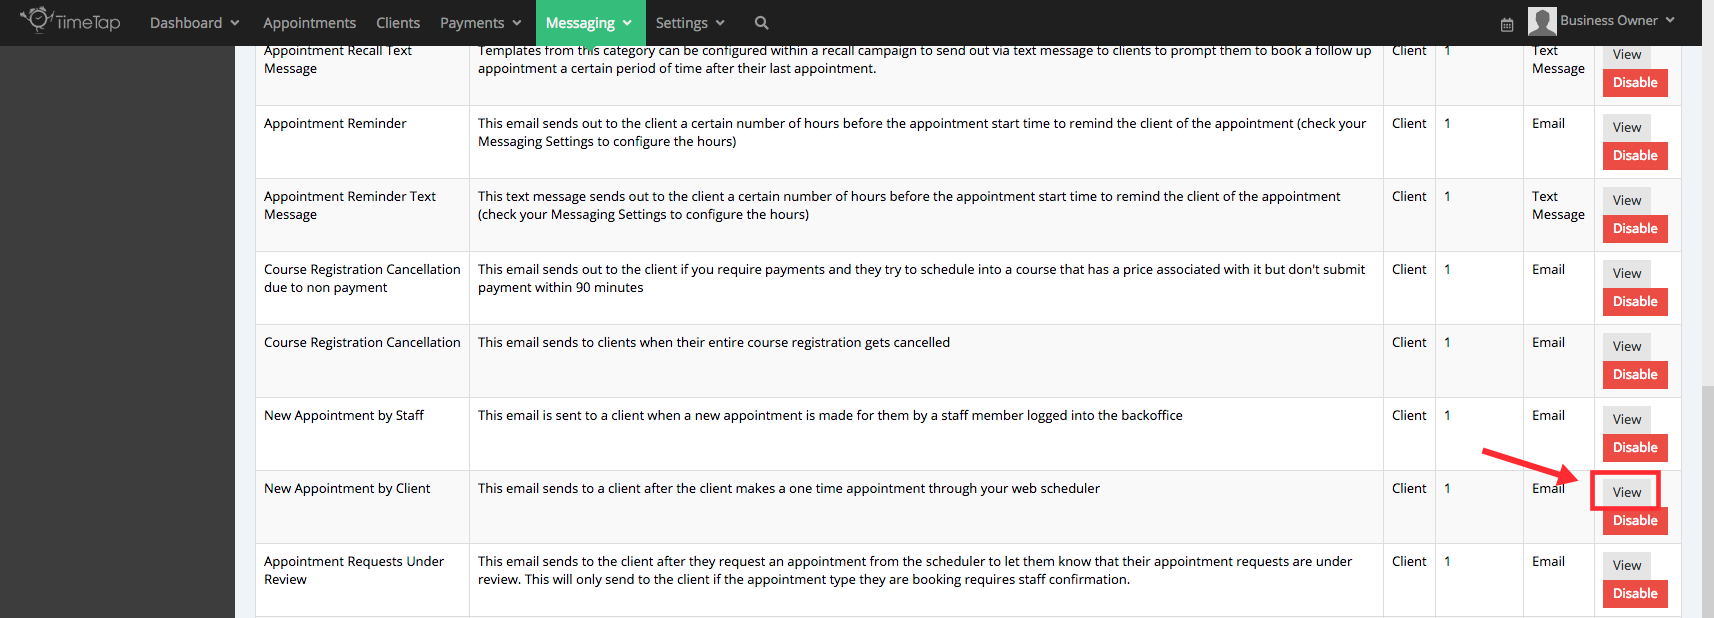
That will take you to a list of all the templates you have set up in that category (by default it is just 1). We now want to create a custom template for a specific language so that if a client goes to book an appointment on the scheduler and their locale property is set to the language es (or Spanish) then they should get this new custom template.
To do that, click the "Clone" button next to the default template in the category view:

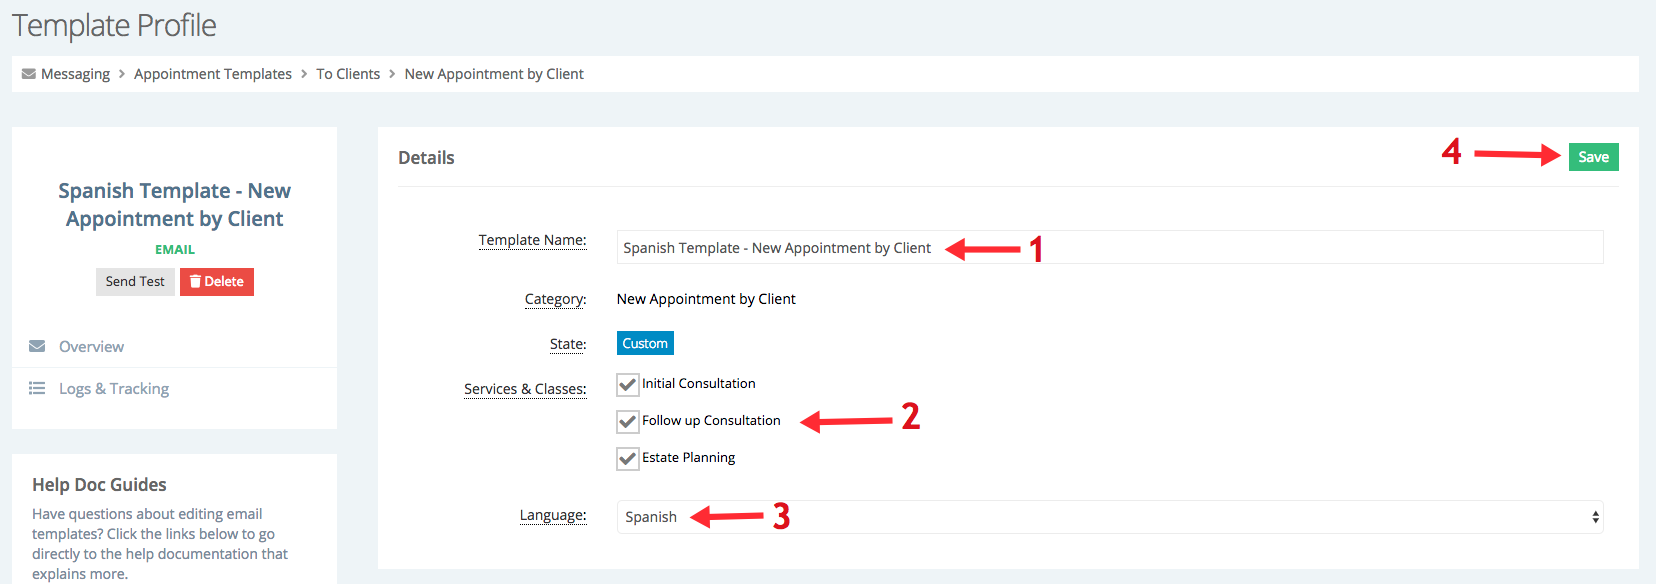
On the Template Profile page, I will:
- Name the template "Spanish Template - New Appointment by Client" (this is only seen by staff so no need to have a friendly name for candidates)
- Select the service for which I want this email to be sent for, in this case I'll select all
- Then select the language I am translating it for (in this case "Spanish")
- Click Save
Now, because we cloned this from the default template and because the default template was in English, the subject of the email and the body of the email for this new "Spanish Template - New Appointment by Client" template we just created will also be in English. So then next step will be to take the current subject line and body and translate them over to Spanish. Right now, the subject line and body reads as:
Subject: [Appointment] %STAFF_FULLNAME% on %APPT_DATE_TIME%
Body:
Your appointment has been scheduled.
Dear %CLIENT_FIRSTNAME%,
This is to confirm that your appointment with %PROFESSIONAL_FULLNAME% for a %REASON% has been scheduled for %APPT_DATE_TIME%.
Our Address:-
%BUSINESS_NAME%
%LOCATION_ADDRESS%
To cancel or reschedule your appointment before the scheduled time, please click %APPT_CANCEL_URL%
So we'll want to change everything that is NOT a tag (meaning everything that is not surrounded by % sign marks) and swap it out for the language of this template, Spanish. That will make it so that our template will read as follows:
Subject: [Compromisso] %STAFF_FULLNAME% em %APPT_DATE_TIME%
Body:
Su cita ha sido programada.
Estimado(a) %CLIENT_FIRSTNAME%,
Este mensaje es para informarle que usted tiene una cita programada con %PROFESSIONAL_FULLNAME% para %REASON% el día %APPT_DATE_TIME%.
Nuestra dirección:-
%BUSINESS_NAME%
%LOCATION_ADDRESS%
Para cancelar o reprogramar su cita antes de la hora agendada presione: %APPT_CANCEL_URL%
Notice that I kept my tags the same. Only the surrounding language in the body was changed. Here is how it will look saved on the Template Profile view:
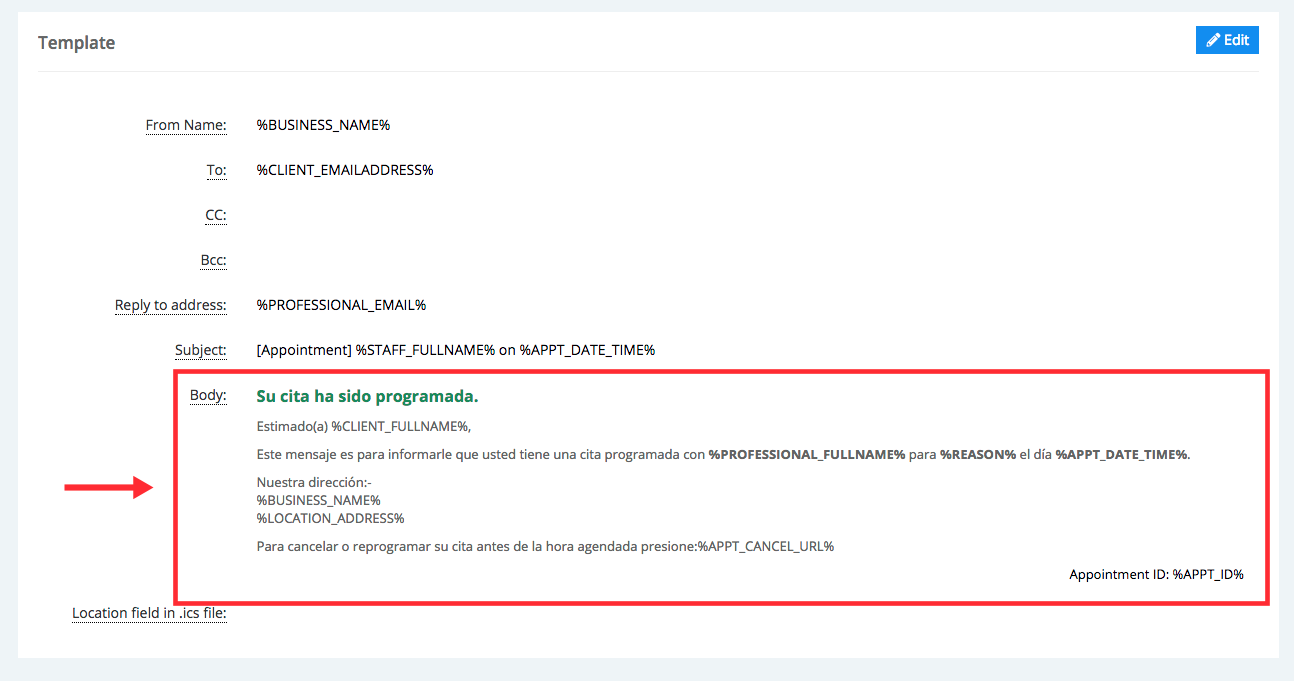
Now, if a client books an appointment and his/her locale is set to Spanish, the confirmation email they receive will also be in Spanish.
Below you'll see a screenshot of the email that appears in the inbox for the client whose locale is set to the language Spanish immediately after they finish booking an appointment on the scheduler:
You'll notice that because this is a client whose locale is set to a Spanish language, they received the custom template that we had assigned to the Spanish language. You'll also see that any of the tags we provided translations for (like %REASON%) filled in with their translation values and not the default values (i.e. reads as "Consulta Inicial" instead of "Initial Consultation").
Again, you'll need to do this for each of the templates that you want the client to receive in their respective language. Please reach out to our support team if you have any questions on any of this.
- Instructions for Chrome: https://support.google.com/chrome/answer/173424
- Instructions for Firefox: https://pchelp.ricmedia.com/change-mozilla-firefox-language-settings/
- Instructions for Internet Explorer: https://answers.microsoft.com/en-us/ie/forum/ie9-windows_7/how-to-change-language-internet-explorer-9/45b941b0-4848-e011-86fd-d485645a8348
We recommend changing the language setting on a browser used less frequently.
Forcing a Specific Language with the Locale URL Parameter
You can control the language your scheduler appears in by adding the locale parameter to the end of your TimeTap booking link. This is especially helpful if you want to direct users to a version of the scheduler in a specific language, regardless of their browser or device settings.
How to use it:
Simply append /#/?locale=xx to your booking link, replacing xx with the appropriate language code (e.g., en for English, es for Spanish, fr for French).
Example:
https://[webhandle].timetap.com/#/?locale=es
The above formatting will force the scheduler to display in Spanish.